Tuesday 21 September 2010

Alice in Wonderland Party: Games


We put a little tea set in the sand pit so that the toddlers could host their own Mad Hatter's tea party.


The Cheshire Cat I painted was used for a "pin the smile on the Cheshire Cat" game.


Alice plays croquet with the Queen of Hearts using flamingos. Ideally, I'd have liked to have bought proper croquet mallets and painted them to look like flamingos. However, I couldn't justify the cost (our garden isn't very croquet friendly being hilly and slightly downwards sloping so a croquet set would not get a lot of use). So we made our own using some scrap wood and thick wooden dowelling (total cost: about £3).


These are the party bags we sent the kids home with. The girls each got a little Cheshire Cat purse, but the boys ended up with Doctor Who and Spiderman items as it was difficult to find Alice in Wonderland themed stuff to suit them! There were also prizes for the games such as an Alice in Wonderland Audio and book set (only cost me £2!). The party bag fillers all came from a site called Mummy Martin's Toy Box.

Thursday 16 September 2010

Alice in Wonderland Party: Food

Here are a few snaps of the food from our party:


This is my first ever attempt at a topsy turvy cake (also known as a Mad Hatter cake - very appropriate for the theme of the party!).

This type of cake is not for the faint hearted as it is quite complicated. I had no idea where to start so read the tutorial on Cake Central. Being a bit of a cake baking novice, I then decided it was too complicated so I simplified my own version and was still pretty pleased with the result.


We served traditional tea party type food - cakes, biscuits and little sandwiches.


If I was better at icing, I probably would have done something clever and iced "eat me" onto the cakes. But I did this in the most simplified way I could think of, and just made cute little signs with a toothpick.


This was the kids' drinks. I collected and cleaned empty juice bottles, covered them in pretty bright paper and added a "drink me" label.


I'm hoping to do a blog post on the party games next week.

Friday 3 September 2010

Alice in Wonderland Party: Decorations

After a turbulent couple of months and the distraction of the school summer holidays, I am finally ready to start uploading the Alice in Wonderland photos. Today's topic: the decorations.


The Cheshire Cat. Drawn onto wooden board, cut out and then painted with acrylic. The windmill flowers were 99p Shop finds.


We had two playing card soldiers and half a dozen blow up flamingoes.


Inside was decorated with paper lanterns.

You can see the table here, scattered with mini playing cards. There are two teapots on the table with (fake) white roses, which the Card Gardeners have painted red!


The white fabric roses were bought in a Pound Shop. I painted them with red water based paint.


This is the sideboard. We covered it with playing card confetti (from a party supply store), a playing card tower, a bottle labeled "drink me" and a mysterious key.


Playing card towers were placed at strategic points around our house. To keep them standing in the presence of excitable children, the cards are held together with discrete cardboard tabs.


And finally, we blew up fifty red and black helium balloons. I used a heart shaped hole punch on the playing cards then threaded them to the curling ribbon.

Posts on the party games and food to come at a later date!

Wednesday 7 July 2010

TARDIS Birthday Cake

Apologies to anyone who has been checking back for the promised Alice in Wonderland posts. They say bad things happen in threes, and the last month we've been hit by several life affecting and stressful events which have taken my attention away from the blog.

But I've got a few minutes, so here is the TARDIS birthday cake I did for my son's 5th birthday (sorry about the poor quality photo):

tardis cake

Because of outside stresses, I only had 2 hours to construct and decorate the cake when I'd planned to spend most of the day doing it. Luckily 5 year olds don't care about perfection and he was thrilled with it!

Hopefully I will - finally - get the party pics up fairly soon, as long as life is returning to normal for us :-s

Thursday 17 June 2010

How to Make a Dormouse Costume

Since this weekend is my son’s birthday and I’m making a TARDIS cake, I’m going to put off blogging about the Alice in Wonderland party until next week when (hopefully) I’ll have more time. Today I’m going to write a little bit about making a dormouse costume.

Here are a couple of photos of my youngest dressed as a dormouse. It was incredibly difficult to get a decent photo of him in his fancy dress outfit because (a) he wont stay still for more than 2.5 seconds and (b) he doesn’t like anything on his head so won’t put his hood up to show off the mouse ears I sewed on.

dormouse costume

dormouse costume

The dormouse costume was made with a brown hooded top, a pair of brown trousers, some foam cover wire and some peach coloured craft foam. The first bit I did was the tail. First I removed some of the foam coating from around one end of the wire, then used pliers to bend the newly exposed wire into a loop. I then used a small pair of scissors to make the other end of the tail more rounded, by snipping off small pieces of foam. Once this was done I sewed the tail onto the back of the trousers.

Next I did the ears. I cut out two teardrop shapes, cut off the top of each one then folded each one in half and sewed the bottom edge together to create a more natural ear shape, (it’s difficult to explain but hopefully you can understand what I mean from the photos). I then sewed the ears onto each side of the hood using peach coloured thread. And that’s all I had to do to make a dormouse costume. If I’d had a little more time I’d probably have made a little bow tie and sewn it onto the top.

All the children looked great at the party. Among the Alice in Wonderland costumes for boys we had playing cards, Mad Hatters, white rabbits and Tweedle Dum. When it came to the girls we, of course, had Alice in Wonderland costumes, but also a white rabbit, butterfly and Tweedle Dee.

Check back over the next few weeks to see photos of the party decorations, food and games!

Thursday 10 June 2010

Doctor Who Cakey Goodness!

Just a brief post today as I'm busy attempting to bake a Mad Hatter cake (also known as a Topsy Turvy cake) for this weekend's party. Expect lots of Alice in Wonderland party posts in the next few weeks!

I’ve been looking around a lot at cakes recently as my son’s birthday is coming up and he’s been asking for a Doctor Who cake. I’m leaning towards doing a Tardis cake since I found out Dr Oetker’s ready coloured icing packs now come with blue in the box (I tried colouring my own blue icing for his first birthday when I did a Pocoyo cake - never again!).

I’ve found some really fabulous cakes on the ‘net, which I’ll share here for other cake baking parents with Doctor Who mad sons!

fandomania.com/fandomestic-10-brilliant-doctor-who-themed-cakes

I love number 2 on the list. It’s similar to what I have in mind for my son, except I don’t think mine will turn out this amazing!

But the best ones I’ve found were featured on the Sunday Sweets section of Cake Wrecks:

cakewrecks.blogspot.com/2009/08/sunday-sweets-doctor-who.html

Check out the last featured cake where the baker actually decorated the inside of the Tardis too, with mirrors and LEDs. That’s not a cake, that’s a work of art.

Friday 4 June 2010

My Cake Creations

I always like looking at other people’s cake baking creations, so I thought I’d share mine.

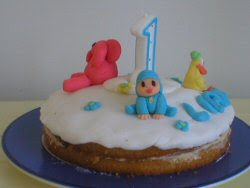
This was my first attempt at a child's birthday cake (for my son’s first birthday). With hind sight, not the greatest cake ever made but my son could recognise the characters and he liked it, which is what counts!

pocoyo birthday cake


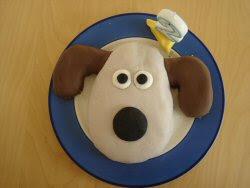
This was his second birthday cake (Gromit). I kept the design really, really simple that year as I was pregnant with his brother and the sight of food made me feel nauseous! It was still an improvement on my cake decorating attempt for his first birthday.

gromit birthday cake

This was his third birthday cake. It was based on a Thomas the Tank Engine design by Debbie Brown (I think the book it’s from is out of print now - “Favourite Character Cakes“). I altered the design and did Gordon, partly because Gordon is number 3, but mostly because Dr Oetker didn’t do ready coloured blue icing at that point and I didn’t want to colour my own!

thomas the tank engine cake

Here’s the Ben 10 cake I did for his forth birthday. I had planned something more elaborate, but a family member being hospitalised meant I had very little time for cake baking in the end. I’m quite pleased with it considering the decorating literally only took me an hour!

ben 10 cake

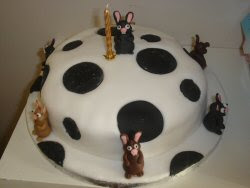
Now for son number 2’s birthday cakes! This was his first one, inspired by a cake in Debbie Brown’s Wallace and Gromit Cracking Celebration Cakes. I actually enjoyed modelling all the little bunnies and this might be my favourite cake I‘ve ever baked.

wallace and gromit cake

This was his most recent birthday cake. It is also based on a Debbie Brown design, except I used Pato (from Pocoyo) rather than Spot.

pocoyo birthday cake

This Mr Men cake is the one I baked for my other half’s thirtieth. Yet again, it is a Debbie Brown design (I copied this one faithfully though).

mr men cake

The Peppa Pig cake is the only girl’s cake I’ve ever baked! It was for my friend’s daughter’s birthday.

peppa pig cake

Finally, here is the ghost cake I made for the Halloween. I believe it was from “Storybook Cakes” by Lindy Smith. It was really easy to make and didn’t take long.

ghost cake

With two birthdays coming up I should be able to share more of my cakes soon!